See Who's Calling Before You Pick Up: How Timeli.sh Syncs Your Client Contacts to Your Phone
Timeli.sh team|June 9, 2026|7 min read|No comments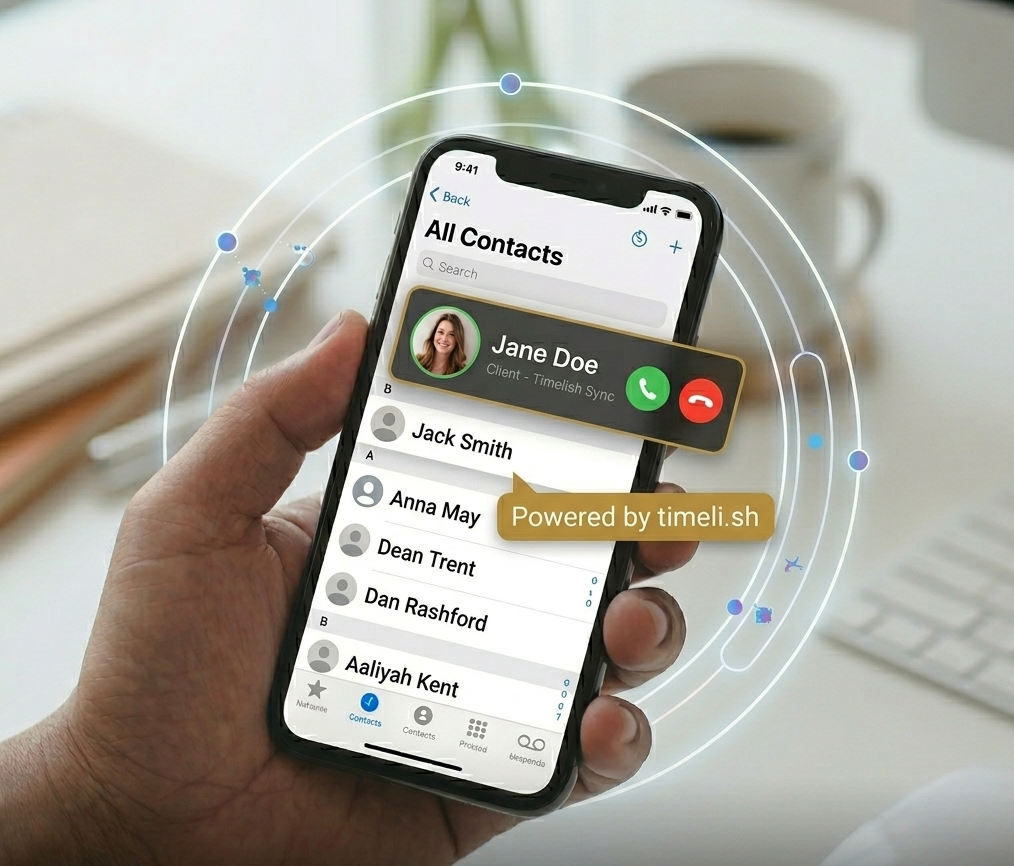
Your phone rings. An unknown number. You answer, and it turns out to be a client calling to ask about their appointment.
If you already had their name in your contacts, you would have known that before picking up. You could have answered differently, pulled up their booking, and been ready for the conversation instead of scrambling to figure out who you are talking to.
Most salon owners have a client list sitting inside their booking system that never makes it to their phone. Their personal contacts are their personal contacts. Their business clients live somewhere else entirely. The two never connect.
Timeli.sh has a feature that closes that gap. It is called CardDAV, and once it is set up, your client list syncs directly to the native contacts app on your phone. Every client who has ever booked with you shows up by name when they call.
What Is CardDAV?
CardDAV is a standard protocol that lets devices and apps share contact information with each other. You have probably used it without knowing it. When you sign into your iPhone with an iCloud account and your contacts appear automatically, that is a similar sync happening behind the scenes.
CardDAV does the same thing for your Timeli.sh client list. Instead of your contacts living only inside your booking dashboard, they live on your phone too, automatically, and stay up to date as new clients book with you.
You do not need to export anything, import anything, or manually add clients to your phone. The sync handles it.
One important thing to know: the sync is read-only. Your Timeli.sh client list flows to your phone, but changes made in your phone's contacts app do not flow back to Timeli.sh. Your business data stays clean and controlled inside the platform. Your phone just gets a live, read-only view of it.
Why It Is More Useful Than It Sounds
The obvious benefit is caller ID. When a client calls, their name appears on your screen. You answer knowing who it is, which appointment they have coming up, and roughly what they might be calling about. That is a small thing that makes every client interaction feel more personal and professional.
But there are a few other benefits worth knowing about.
Texting clients by name. When a client reaches out by text, you see their name instead of a number. You can respond directly from your messages app without having to look them up in your booking dashboard first.
Searching your client list on your phone. Need to call a specific client back? Search their name in your phone's contacts, and their number is right there. No need to log into Timeli.sh, navigate to the client list, and find the entry manually.
A consistent address book across devices. If you have multiple staff members who each use their own phones for client communication, each of them can connect Timeli.sh CardDAV to their own device. Everyone on the team sees the same client list without anyone having to manually share contacts.
Step 1: Install the CardDAV App in Timeli.sh
CardDAV on Timeli.sh is available as a separate app that you install from within your dashboard. This keeps it optional for users who do not need it and makes setup straightforward for those who do.
To install it:
Log into your Timeli.sh dashboard
Go to the Apps → Store
Find the CardDAV app and install it
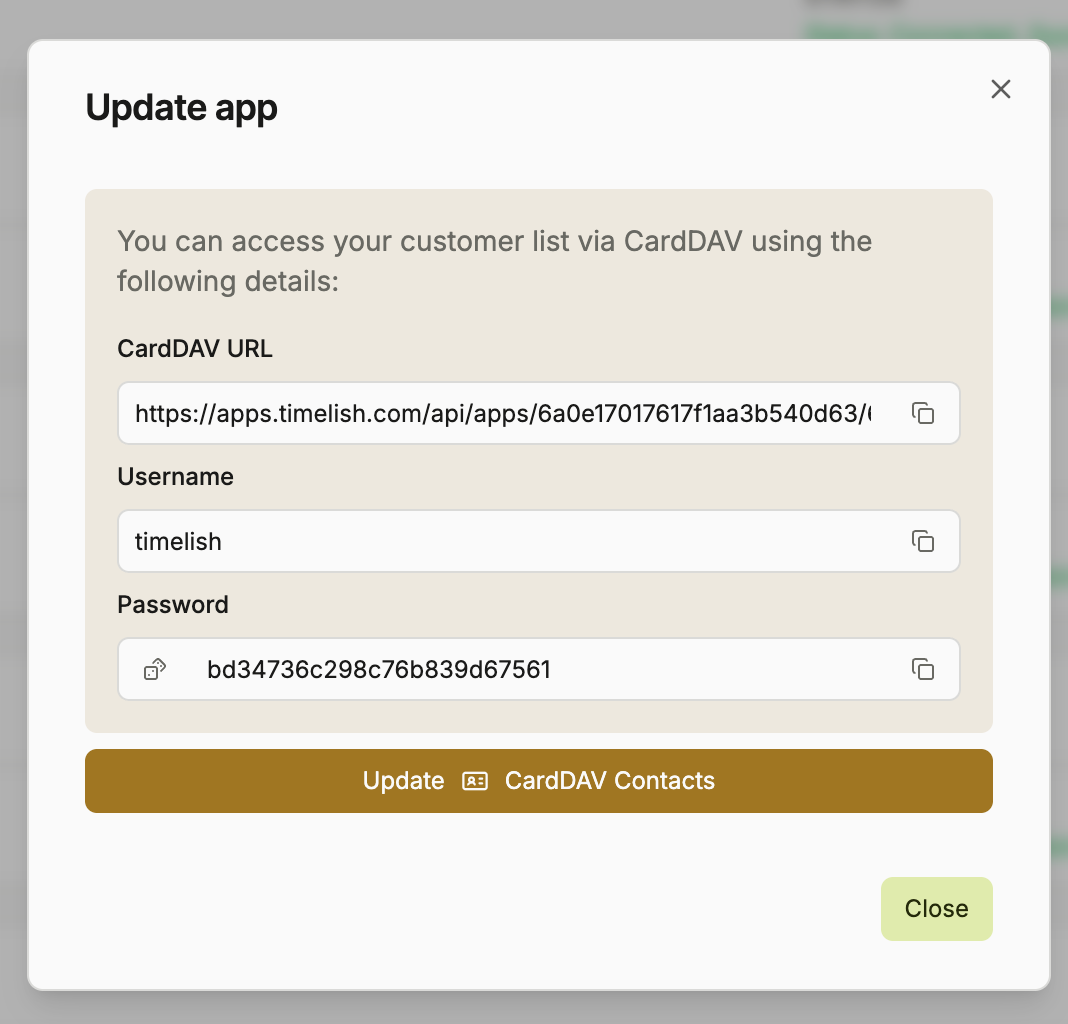
Once installed, the app generates three things you will need for the next step:
A server URL (a web address unique to your Timeli.sh account)
A username
A password
Keep this screen open or copy these details somewhere handy. You will need all three when setting up your phone.
Step 2: Add the CardDAV Account to Your iPhone
The following steps work on any iPhone running a recent version of iOS.
Open the Settings app
Scroll down and tap Apps, then tap Contacts
Tap Contacts Accounts
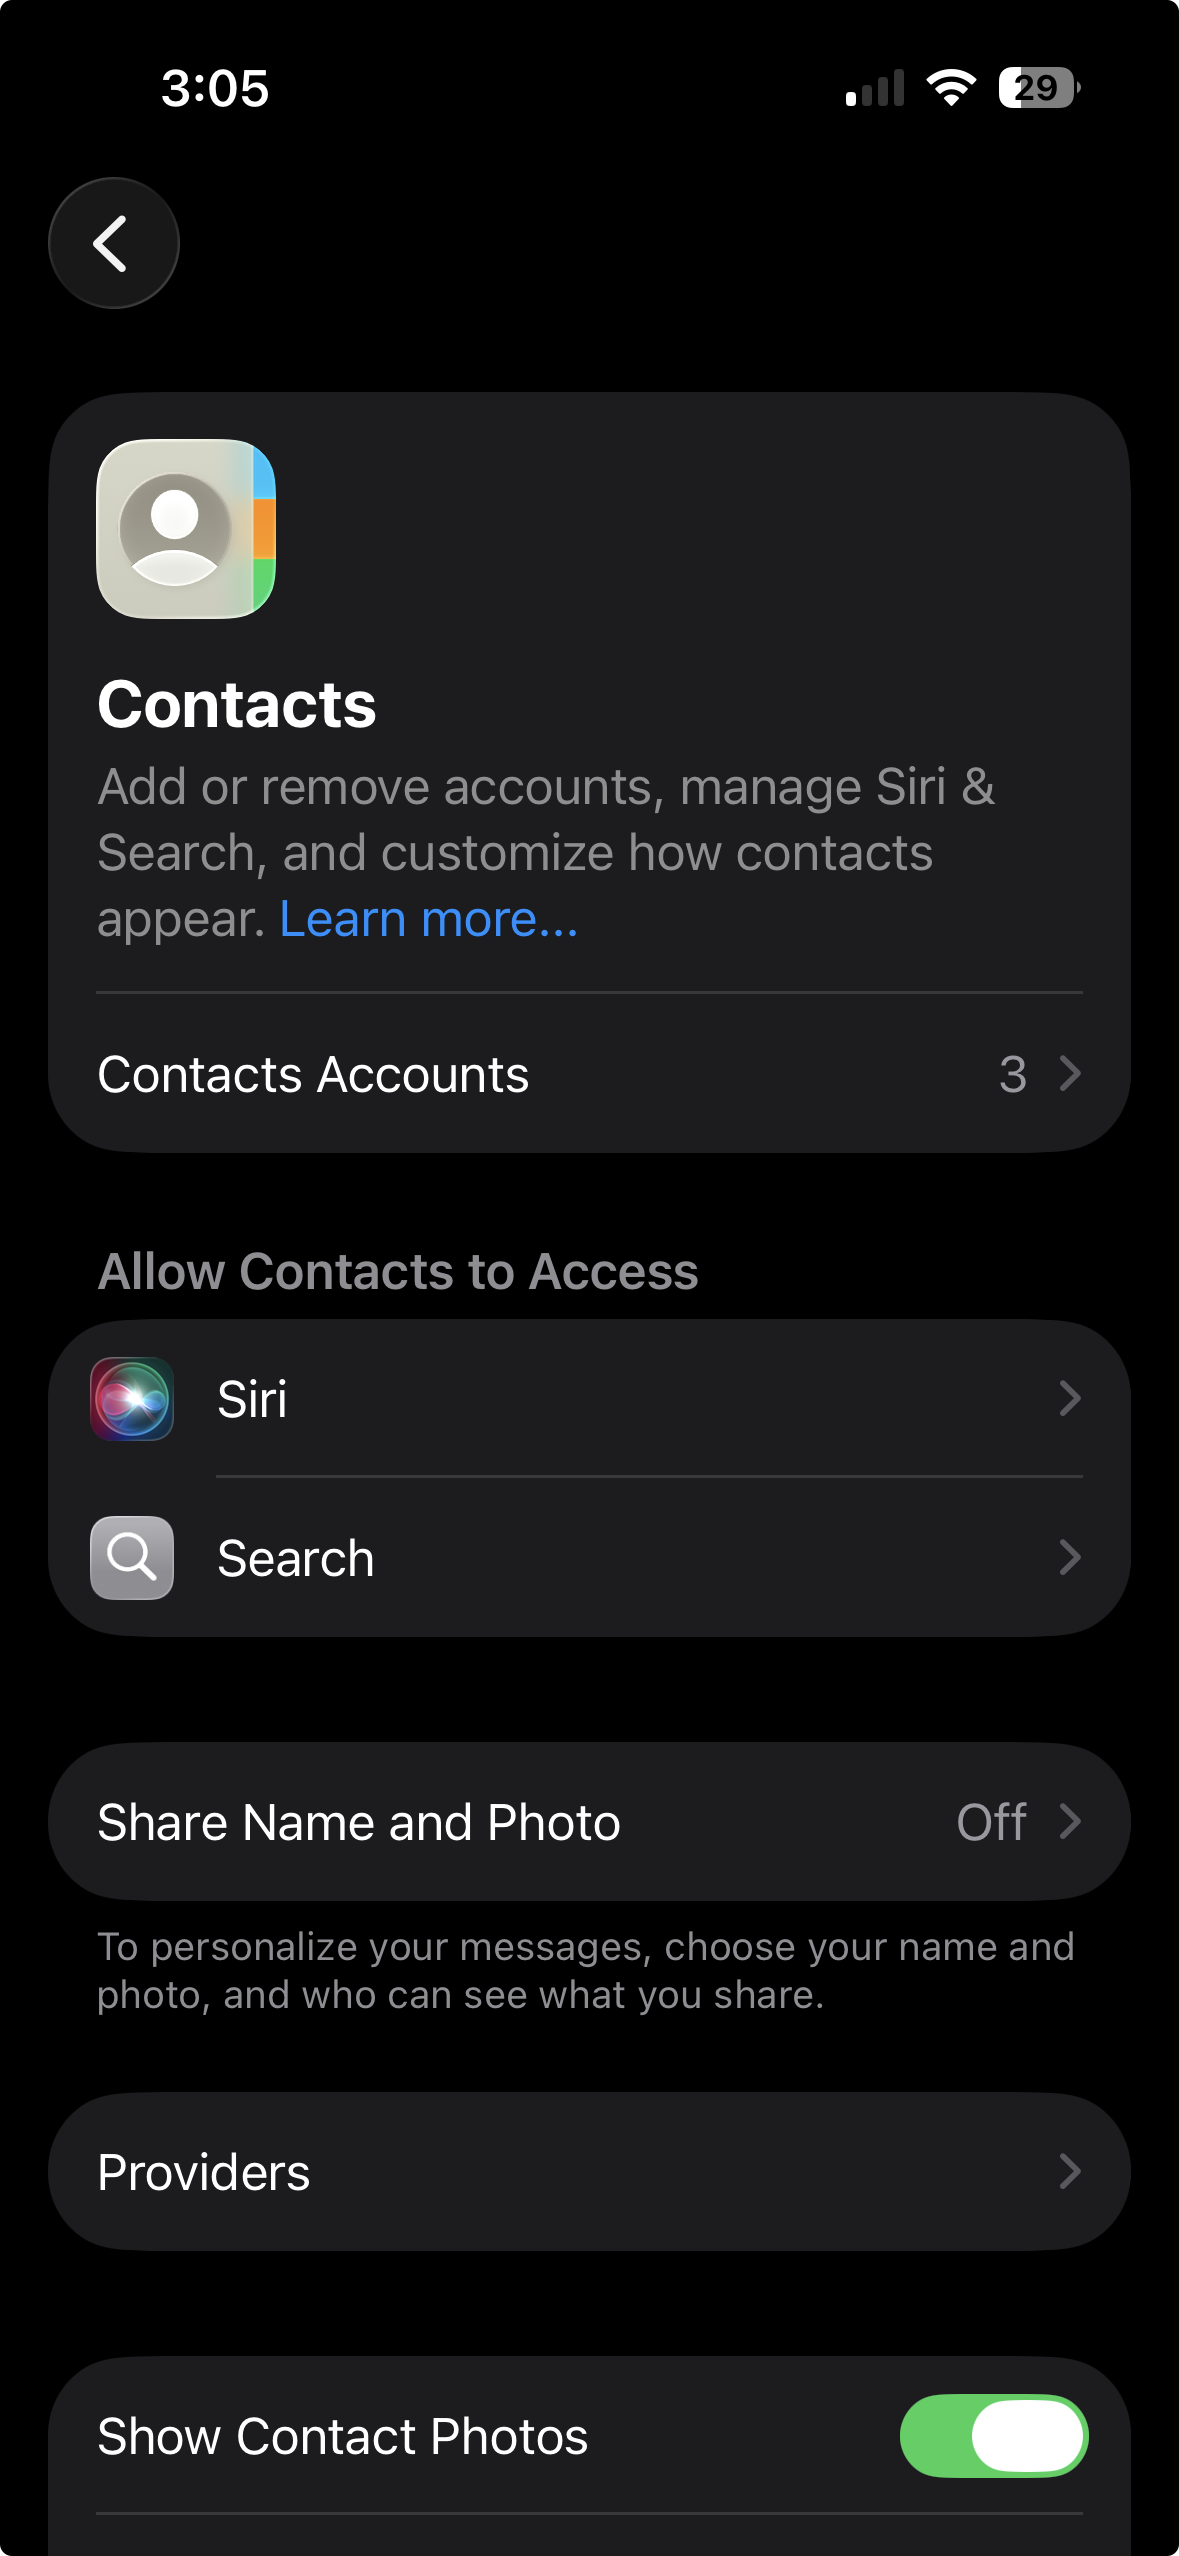
Tap Add Account
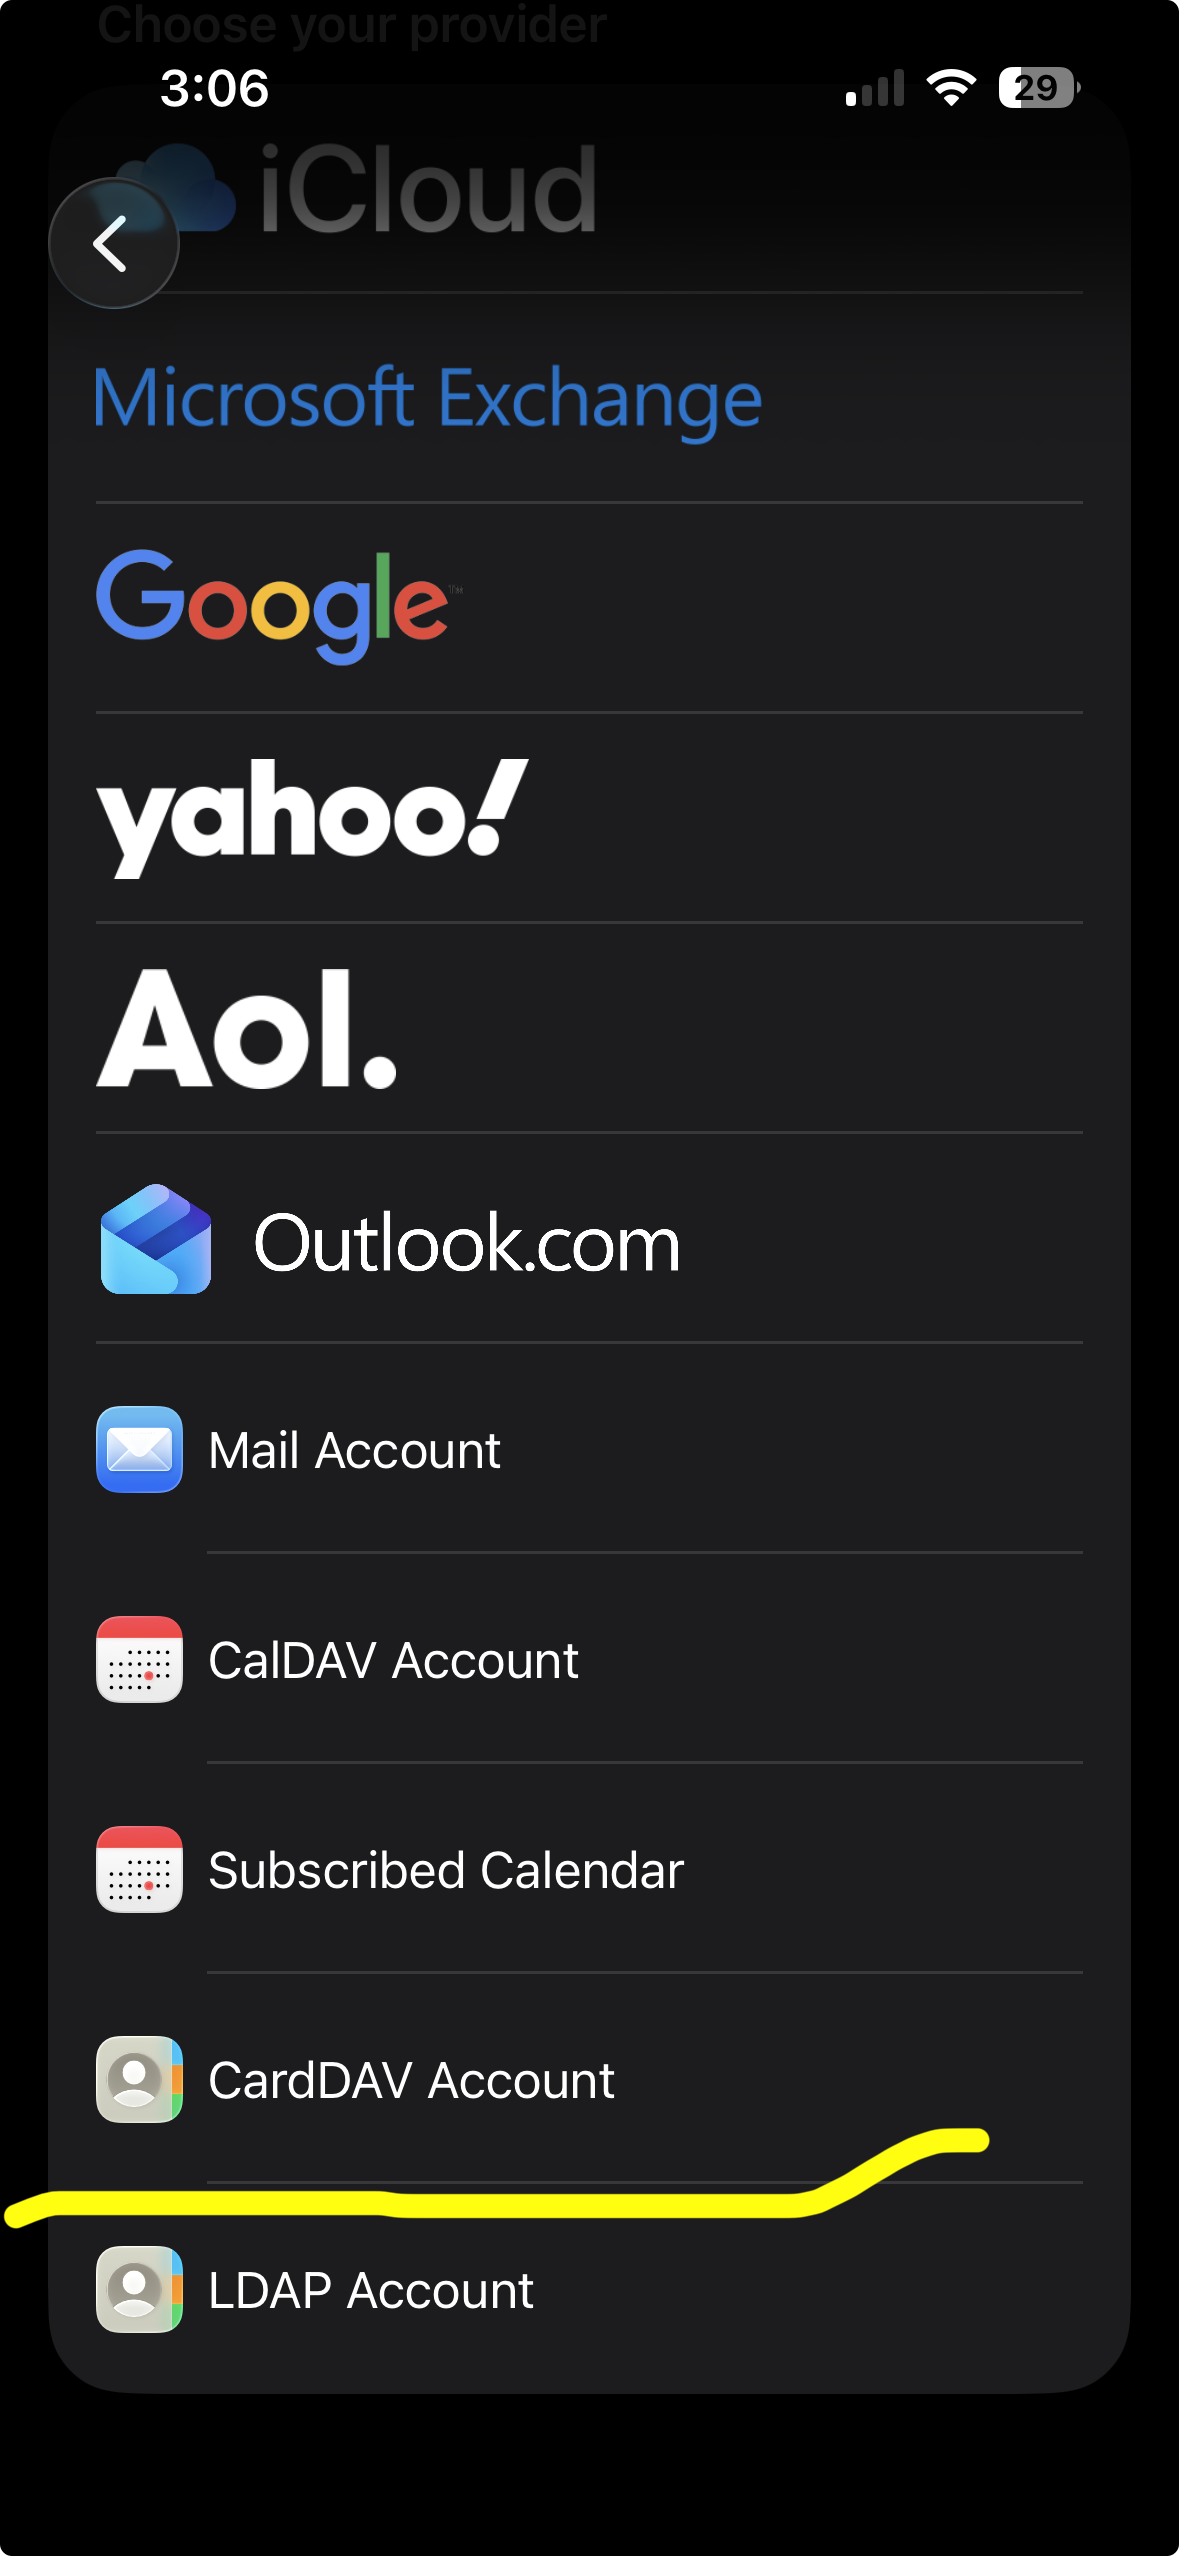
Tap Other at the bottom of the list
Tap Add CardDAV Account
Fill in the fields:
Server: paste the server URL from your Timeli.sh CardDAV app
User Name: paste the username from your Timeli.sh CardDAV app
Password: paste the password from your Timeli.sh CardDAV app
Description: type something like "Timeli.sh Clients" so you can identify the account later
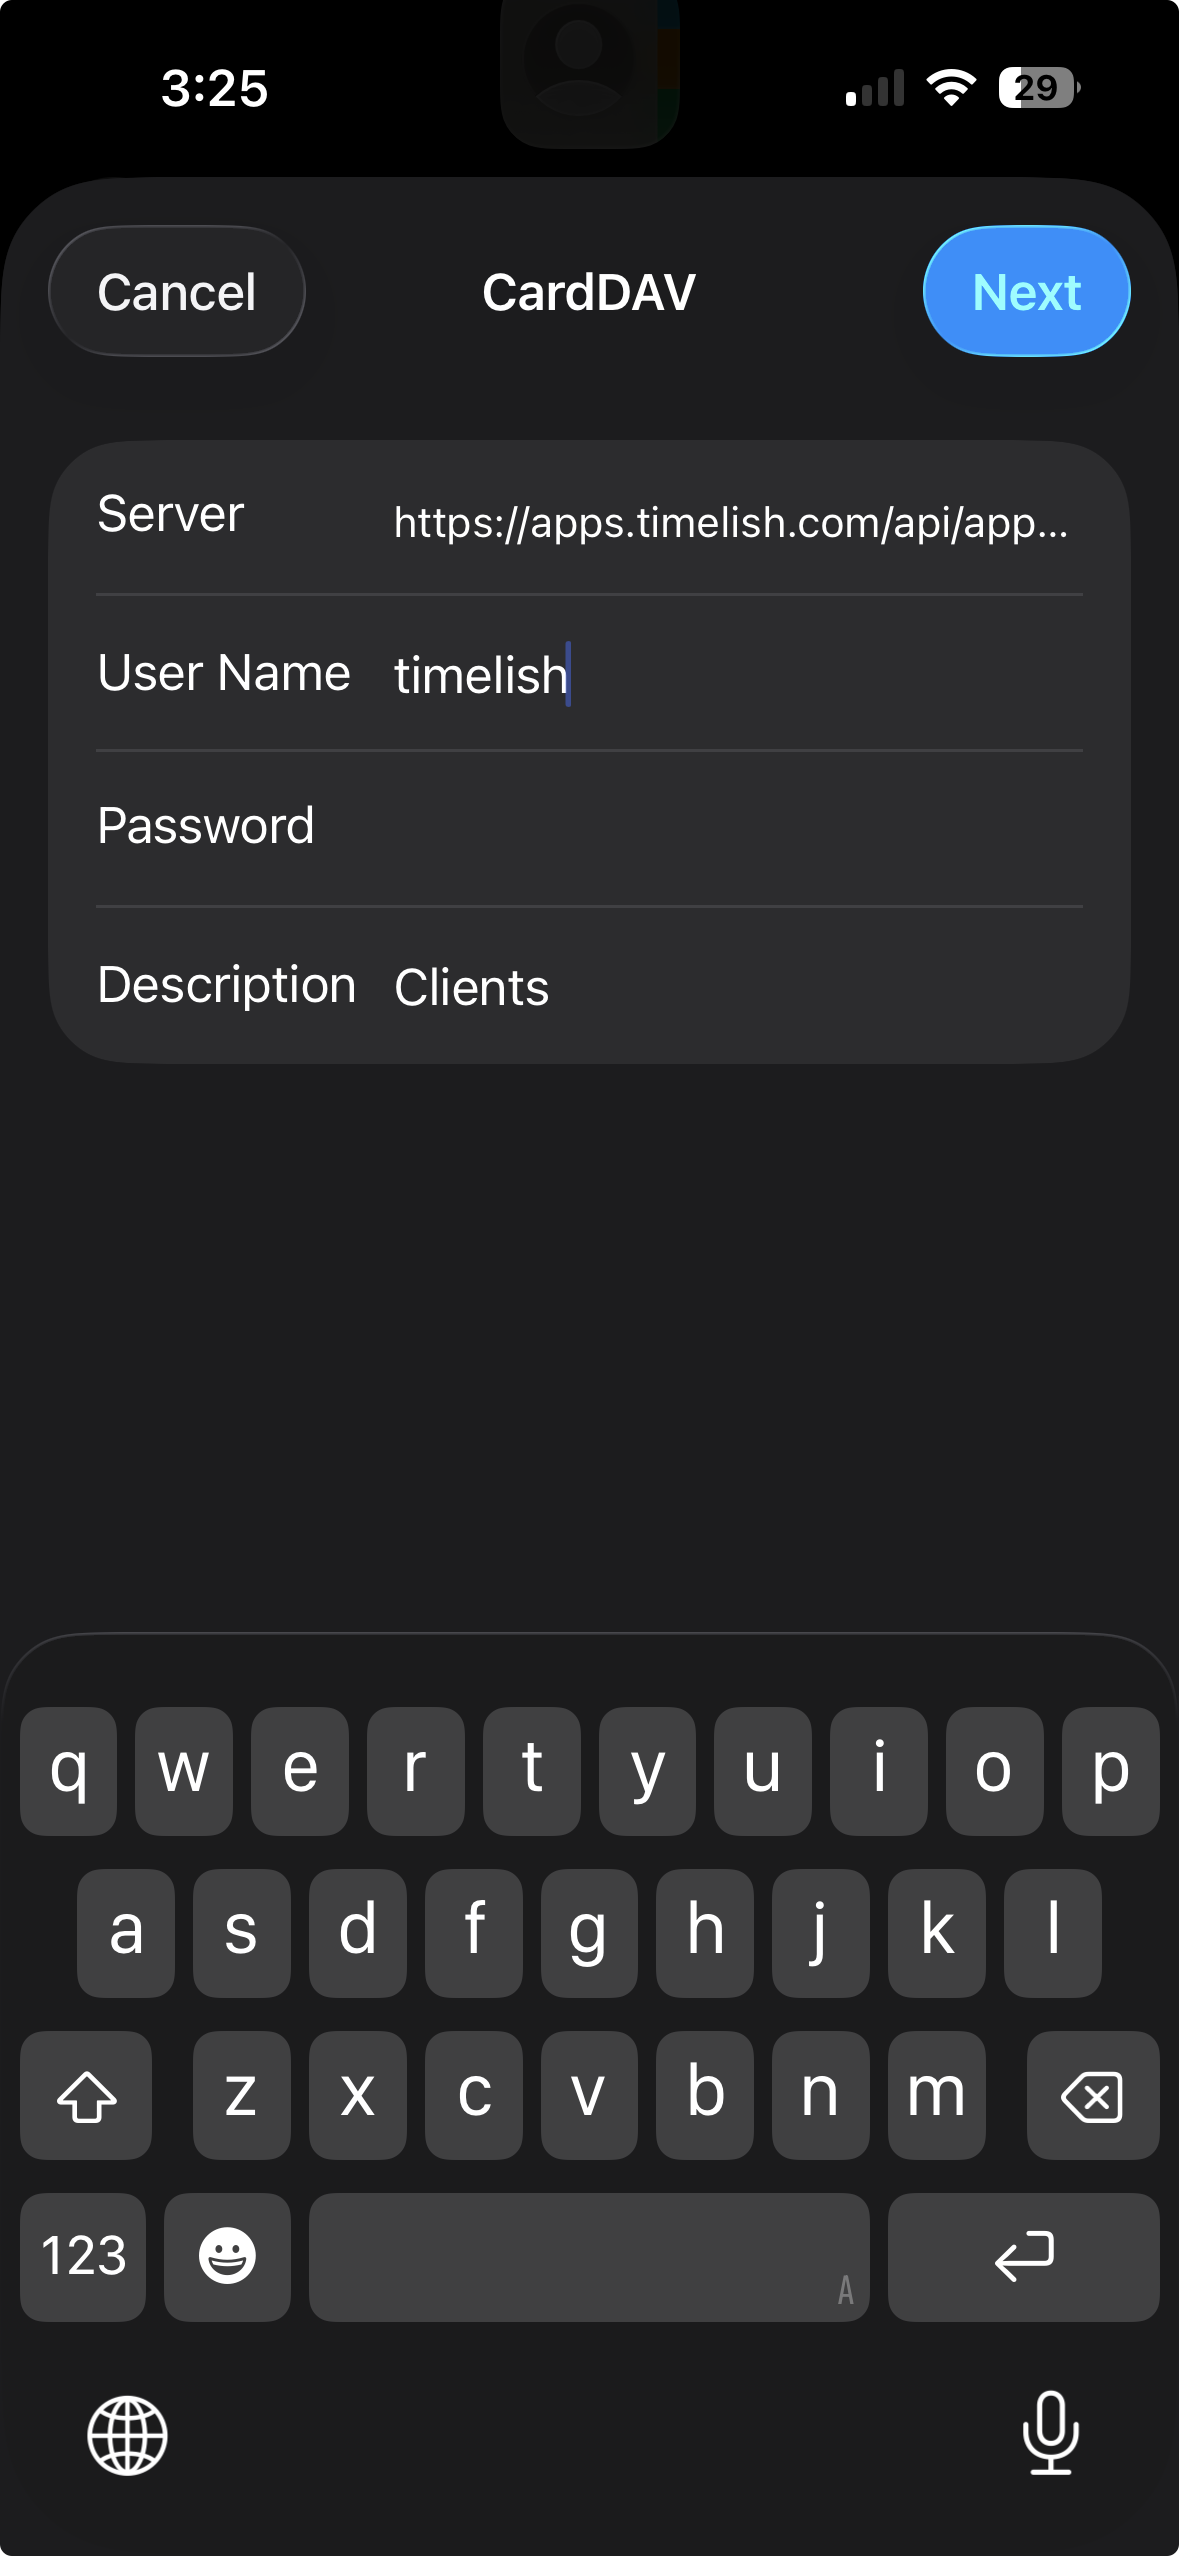
Tap Next in the top right corner
Your iPhone will verify the credentials. Once verified, tap Save
Your Timeli.sh clients will begin appearing in your iPhone's Contacts app within a few seconds. From this point on, the list stays in sync automatically. New clients who book with you will appear in your contacts without any action from you.
Step 3: Add the CardDAV Account to Your Android Phone
Android does not have built-in CardDAV support the way iOS does, so you will need to install a free app first. The most reliable option is DAVx⁵, available on the Google Play Store.
Download and install DAVx⁵ from the Google Play Store
Open the app and tap the + button to add a new account
Select Login with URL and user name
Fill in the fields:
Base URL: paste the server URL from your Timeli.sh CardDAV app
User name: paste the username
Password: paste the password
Tap the arrow or Next to continue
DAVx⁵ will detect your address book. Select it and tap the sync icon
Open your phone's Contacts app and your Timeli.sh clients will appear
DAVx⁵ runs quietly in the background and keeps your contacts in sync on a schedule. You can also trigger a manual sync from inside the app at any time.
A Few Things Worth Knowing
Contacts are read-only on your phone. As mentioned above, this is intentional. Your client list in Timeli.sh is your business data. Editing contacts on your phone does not change anything in Timeli.sh. Think of your phone contacts as a live view, not an editable copy.
New clients appear automatically. Once the sync is running, you do not need to do anything. Every new client who books through your Timeli.sh page will show up in your phone contacts as their information is added to your account.
Removing the account removes the contacts. If you ever want to disconnect the sync, simply remove the CardDAV account from your phone's settings. The contacts that came from Timeli.sh will disappear from your phone but your data in Timeli.sh remains completely intact.
Multiple team members can each connect their own phone. Every person on your team can install the CardDAV app and connect it to their own device independently. Each connection is separate, and removing one does not affect the others.
Getting Started
If you are already on Timeli.sh, head to the Apps section of your dashboard, install the CardDAV app, and follow the steps above for your device. The whole process takes about five minutes.
If you are not on Timeli.sh yet, this is one small example of how the platform is built to fit into how you actually work rather than asking you to change how you work to fit the platform.
Start your free trial at Timeli.sh
Running into trouble during setup? Leave a comment below or reach out to our support team and we will walk you through it.
No comments yet. Be the first to comment.